Sketching arcs using a center point and two endpoints | |||||||
|
| ||||||
Context:
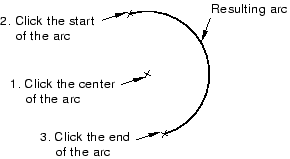
The following figure shows the resulting arc:
An arc that forms part of an analytical rigid surface cannot subtend an angle greater than 180°. If necessary, append two arcs to create an arc that subtends an angle of more than 180°. There is no such limitation for deformable bodies or discrete rigid surfaces.
You should take care positioning points while sketching because this positioning can affect the quality of your mesh. Points in the sketch become vertices of the part you are creating or modifying. In turn, when you mesh your model in the Mesh module, Abaqus/CAE converts these vertices into fully constrained seeds and places nodes at their location. For information on how to subsequently move vertices, see Dragging Sketcher objects.
From the arc tools in the Sketcher toolbox, select the Center with Two Endpoints arc tool
 . For a diagram of the tools in the Sketcher toolbox, see
The Sketcher tools.
. For a diagram of the tools in the Sketcher toolbox, see
The Sketcher tools.
Abaqus/CAE displays prompts in the prompt area to guide you through the procedure.
Move the cursor clockwise from the first endpoint to draw the arc in a clockwise direction. Move the cursor counterclockwise from the first endpoint to draw the arc in a counterclockwise direction. Click the second endpoint to define the length of the arc. If you start drawing the arc and then decide to change its direction, you must return to the first endpoint and move the cursor in the desired direction toward the second endpoint.
Step 2 and Step 3 define the center of the arc and the radius of the arc, respectively. The point that you select in Step 4 defines only the length of the arc, and the point may not lie on the arc. If you want the arc to pass through a vertex of the sketch, you should select that vertex when you click the first endpoint in Step 3.
Tip: If necessary, click the button  to reverse the selection of the endpoints.
When you have finished creating arcs, do one of the following:
-
Click mouse button 2 anywhere in the Abaqus/CAE window.
-
Select any other tool in the Sketcher toolbox.
-
Click the cancel button
 in the prompt area.
-