Context:
For example,
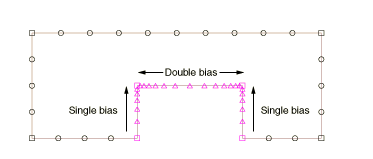
Figure 1
shows a combination of edges with single- and double-bias seeding.
Figure 1. Single- and double-bias seeding.
All the edge seeding tools generate edge seeds, which are displayed in
magenta. Edge seeds override any part or instance seeds you have specified. You
should apply seeds to all edges.
From the main menu bar, select
.
Abaqus/CAE displays prompts in the prompt area to guide you through the procedure.
Choose the approach for picking from the viewport:
-
For single-bias seeding, toggle on Use single-bias
picking and select the edges you want to seed. You can select only
edges for single-bias seeding, and you must select each edge near the end where
you expect the mesh to be denser.
-
For double-bias seeding, toggle off Use single-bias
picking and select the edges, faces, or cells you want to seed. The
location of your selection does not influence the seeding.
By default,
Abaqus/CAE
allows you to select only edges to seed. To select faces or cells to seed, use
the Selection toolbar to change the type of object that
you can select to Face, Cells, or
All. For more information, see
Filtering your selection based on the type of object.
When you have finished selecting edges, faces, or cells, click
Done in the prompt area.
From the Local Seeds dialog box that appears,
choose the bias control (Single or
Double).
Note:
If you selected edges that you previously seeded using a combination
of bias seeding methods,
Abaqus/CAE
provides an As Is option that allows you to retain the
bias seeding method on the selected edges.
If you selected single-bias seeding,
Abaqus/CAE
displays arrows on each selected edge indicating the direction in which the
element density will increase. If you selected double-bias seeding,
Abaqus/CAE
displays arrows at the center of each edge indicating the directions in which
the element density will increase.
Choose the sizing method (By size or By
number).
-
If you selected By size, enter the minimum
and maximum size of the elements—the approximate size of the elements at each
end of the biased seeding. You cannot apply curvature control to biased
seeding.
-
If you selected By number, enter the number
of elements and the bias ratio. The bias ratio is the approximate ratio of the
size of the largest and smallest element on the edge and must be greater than
one.
-
If desired, click Select to reverse the
direction of the seeding bias. (When you select an edge to which biased seeding
will be applied, the element density increases toward the end of the edge that
is closest to the location of your pick.)
Abaqus/CAE
reverses the direction of the arrow on each selected edge.
Note:
If you selected edges that you previously seeded using a combination
of element size or number parameters,
Abaqus/CAE
provides an As Is option that allows you to retain the
size parameters on the selected edges.
If desired, change the default seed constraints by clicking the
Constraints button in the prompt area and responding to
the dialog box that appears. See
Applying constraints to edge seeds,
for further information on setting seed constraints.
If desired, toggle on Create set with name to
create a set containing the edges, faces, and cells you selected and enter the
name of the set. If you subsequently want to change the seeding, you can select
the set in Step 2 without having to reselect the edges, faces, and cells.
Click Apply to view the seeding that
Abaqus/CAE
will use.
Magenta seeds appear on the selected edges.
If necessary, adjust the values that you entered in the
Local Seeds dialog box.
Click OK to commit the element seeding and to
close the dialog box.
|
 tool, located with the seed tools in the
Mesh module
toolbox. (For more information, see
Using the Mesh module toolbox.)
tool, located with the seed tools in the
Mesh module
toolbox. (For more information, see
Using the Mesh module toolbox.)