Changing the status of an object in a step | ||||
|
| |||
Whether or not you can change the status of an object in a step depends on the step's procedure and the object's status in the step. The manager allows you to make only valid changes to the history of an object. If the operation of one of the buttons would cause an invalid change in status, that button becomes unavailable. For more information, see Modifying the history of a step-dependent object.
The following list describes techniques for manipulating the status of a step-dependent object:
- To select the status that you want to change:
Click in the cell that is located in the row of the object of interest and in the column of the step of interest.
The status of the object in that step becomes highlighted, and, in most cases, some or all of the buttons on the right side of the dialog box become available. The availability of the buttons depends on the status of the object in the current step, in the preceding step, and in the following step.
For example, the Created status of Pressure in Step-3 is selected in the figure below:
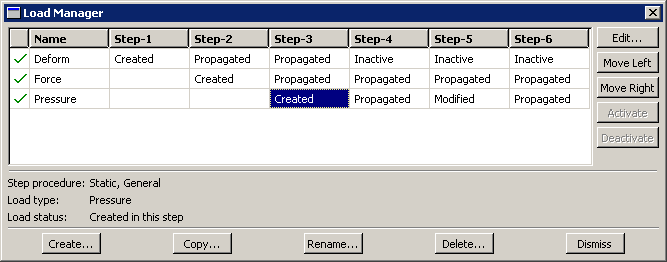
Use the buttons that become available to manipulate the status of the object in the step that you have chosen, as described below.
- To move the status in the selected step to the preceding step:
Click to move the highlighted status from the selected to the preceding step.
For example, the Created status of Pressure in Step-3 is selected in the history shown above. If you clicked , the history would change as shown below:
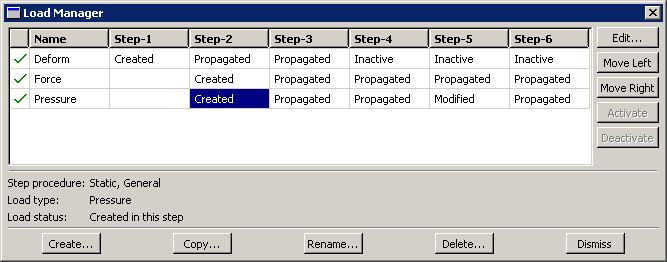
The Created status of Pressure moves to Step-2 and is replaced by Propagated in Step-3.
- To move the status in the selected step to the following step:
Click to move the highlighted status from the selected step to the following step.
In the history shown below, for example, the Modified status of Pressure in Step-5 is selected.
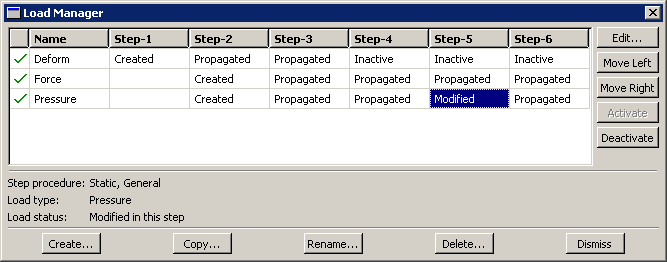
If you clicked , the history would change as shown below:
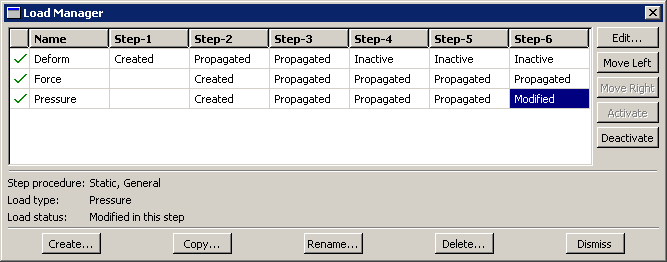
The Modified status of Pressure moves to Step-6 (indicating that the modifications to Pressure become effective in Step-6), and Modified is replaced by Propagated in Step-5.
- To deactivate the object in the selected step:
Click to deactivate the object in the selected step.
In the history shown below, for example, the Propagated status of Pressure in Step-4 is selected.
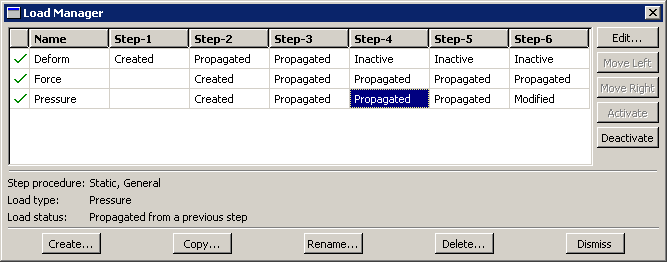
If you clicked , the history would change as shown below:
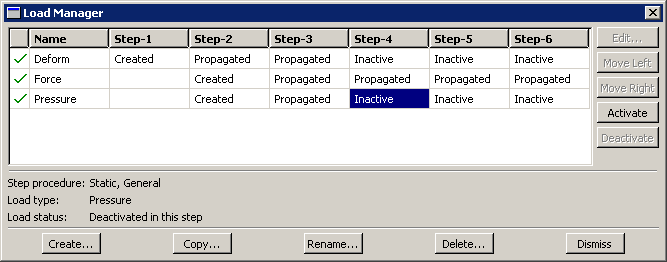
The Propagated status of Pressure in Step-4 changes to Inactive, and the status in all subsequent steps becomes Inactive.
Note:
You cannot deactivate predefined fields using the Predefined Field Manager; you must select Reset to initial in the predefined field editor (for example, see Defining a temperature field).
Warning: If you deactivate an object in a step in which its status is Modified, the modifications to the object are lost. If you later reactivate the object in that step, the original, unmodified version of the object becomes active in that step and in all subsequent steps.
- To reactivate the object in the selected step:
Click to reactivate the object in the selected step.
In the history shown above, for example, the Inactive status of Pressure in Step-4 is selected. If you clicked , the history would change as shown below:

The Inactive status of Pressure changes to Propagated in Step-4 and in any following steps.
Note:
The button is available only in the step in which an object is first deactivated.
You can use the Model Tree to view the status of a step-dependent object, to edit the object, and to deactivate and reactivate the object. However, you must use the step-dependent manager to modify the history of an object by moving it right or left in the sequence of steps. For more information, see The Model Tree.