Postprocessing | ||
| ||
- Deformed model shape and contour plots
The basic result of this simulation is the deformation of the blank and the plastic strain caused by the forming process. We can plot the deformed model shape and the plastic strain, as described below.
To plot the deformed model shape:
Plot the deformed model shape. You can remove the die and the punch from the display and visualize just the blank.
In the Results Tree, expand the Instances container underneath the output database file named Channel.odb.
From the list of available part instances, select BLANK-1. Click mouse button 3, and select Replace from the menu that appears to replace the current display group with the selected elements. Click
 , if necessary, to fit the model in the viewport.
The resulting plot is shown in Figure 1.
Figure 1. Deformed shape of blank at the end of Step 2.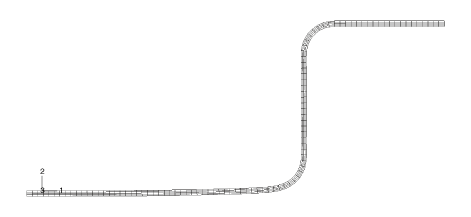
To plot the contours of equivalent plastic strain:
From the main menu bar, select ; or click the
 tool from the toolbox to display contours of Mises stress.
Open the dialog box.
Drag the Contour Intervals slider to change the number of contour intervals to 7.
Click to apply these settings.
Select Primary from the list of variable types on the left side of the Field Output toolbar, and select PEEQ from the list of output variables.
PEEQ is an integrated measure of plastic strain. A nonintegrated measure of plastic strain is PEMAG. PEEQ and PEMAG are equal for proportional loading.
Use the
 tool to zoom into any region of interest in the blank, as shown in Figure 2.Figure 2. Contours of the scalar plastic strain variable PEEQ in one corner of the blank.
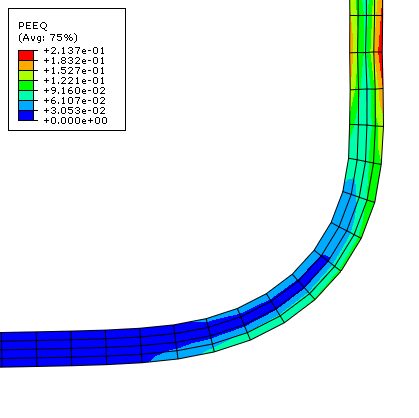
The maximum plastic strain is approximately 21%. Compare this with the failure strain of the material to determine if the material will tear during the forming process.
- History plots of the reaction forces on the blank and punch
The solid line in Figure 3 shows the variation of the reaction force RF2 at the punch's rigid body reference node.
Figure 3. Force on punch.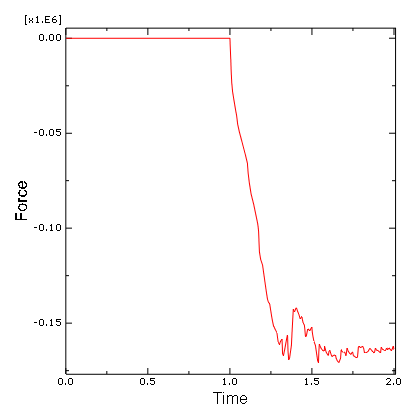
To create a history plot of the reaction force:
In the Results Tree, expand the History Output container. Double-click Reaction force: RF1 PI: PUNCH–1 Node xxx in NSET REFPUNCH.
A history plot of the reaction force in the 1-direction appears.
Open the Axis Options dialog box to label the axes.
Switch to the Title tabbed page.
Specify Reaction Force - RF2 as the Y-axis label, and Total Time as the X-axis label.
Click to close the dialog box.
The punch force, shown in Figure 3, rapidly increases to about 160 kN during Step 2, which runs from a total time of 1.0 to 2.0.
- History plot of the stabilization and internal energies
It is important to verify that the presence of contact stabilization does not significantly alter the physics of the problem. One way to assess this requirement is to compare the energy dissipation due to stabilization (ALLSD) against the internal energy of the structure (ALLIE). Ideally the amount of stabilization energy should be a small fraction of the internal energy. Figure 4 shows the variation of the stabilization and internal energies. It is clear that the dissipated stabilization energy is indeed small.
Figure 4. Stabilization and internal energies.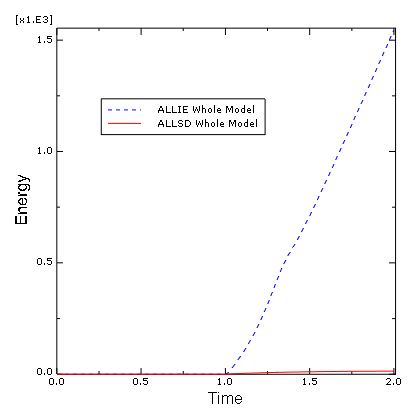
- Plotting contours on surfaces
Abaqus/CAE includes a number of features designed specifically for postprocessing contact analyses. Within the Visualization module, the Display Group feature can be used to collect surfaces into display groups, similar to element and node sets.
To display contact surface normal vectors:
Plot the undeformed model shape.
In the Results Tree, expand the Surface Sets container. Select the surfaces named BLANKTOP and PUNCH-1.PUNCHSURF. Click mouse button 3, and select Replace from the menu that appears.
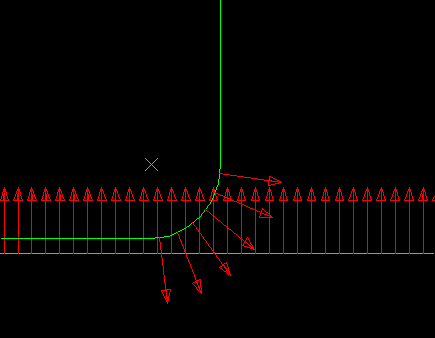
Using the Common Plot Options dialog box, turn on the display of the normal vectors (On surfaces) and set the length of the vector arrows to Short.
Use the
 tool, if necessary, to zoom into any region of interest, as shown in Figure 5.Figure 5. Surface normals.
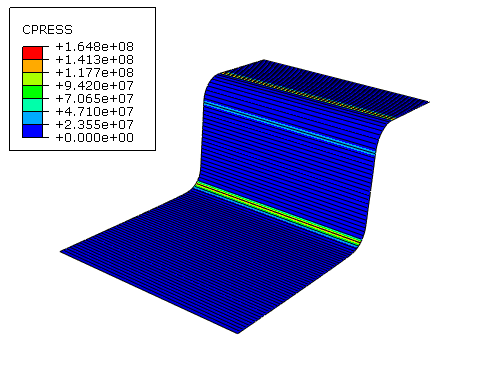
To contour the contact pressure:
Plot the contours of plastic strain again.
From the list of variable types on the left side of the Field Output toolbar, select Primary, if it is not already selected.
From the list of output variables in the center of the toolbar, select CPRESS.
Remove the PUNCH-1.PUNCHSURF surface from your display group.
To visualize contours of surface-based variables better in two-dimensional models, you can extrude the plane strain elements to construct the equivalent three-dimensional view. You can sweep axisymmetric elements in a similar fashion.
From the main menu bar, select .
The ODB Display Options dialog box appears.
Select the Sweep/Extrude tab to access the Sweep/Extrude options.
In the Extrude region of the dialog box, toggle on Extrude elements; and set the Depth to 0.05 to extrude the model for the purpose of displaying contours.
Click to apply these settings.
Rotate the model using the
 tool to display the model from a suitable view, such as the one shown in Figure 6.Figure 6. Contact pressure.