Deep drawing of a cylindrical cup | ||
| ||
ProductsAbaqus/Standard
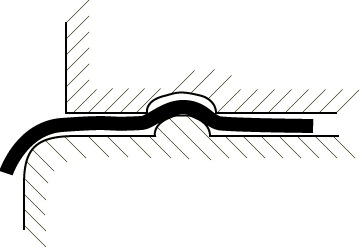
Deep drawing of sheet metal is an important manufacturing technique. In the deep drawing process a “blank” of sheet metal is clamped by a blank holder against a die. A punch is then moved against the blank, which is drawn into the die. Unlike the operation described in the hemispherical punch stretching example (Stretching of a thin sheet with a hemispherical punch), the blank is not assumed to be fixed between the die and the blank holder; rather, the blank is drawn from between these two tools. The ratio of drawing versus stretching is controlled by the force on the blank holder and the friction conditions at the interface between the blank and the blank holder and the die. Higher force or friction at the blank/die/blank holder interface limits the slip at the interface and increases the radial stretching of the blank. In certain cases drawbeads, shown in Figure 1, are used to restrain the slip at this interface even further.
To obtain a successful deep drawing process, it is essential to control the slip between the blank and its holder and die. If the slip is restrained too much, the material will undergo severe stretching, thus potentially causing necking and rupture. If the blank can slide too easily, the material will be drawn in completely and high compressive circumferential stresses will develop, causing wrinkling in the product. For simple shapes like the cylindrical cup here, a wide range of interface conditions will give satisfactory results. But for more complex, three-dimensional shapes, the interface conditions need to be controlled within a narrow range to obtain a good product.
During the drawing process the response is determined primarily by the membrane behavior of the sheet. For axisymmetric problems in particular, the bending stiffness of the metal yields only a small correction to the pure membrane solution, as discussed by Wang and Tang (1988). In contrast, the interaction between the die, the blank, and the blank holder is critical. Thus, thickness changes in the sheet material must be modeled accurately in a finite element simulation, since they will have a significant influence on the contact and friction stresses at the interface. In these circumstances the most suitable elements in Abaqus are the 4-node reduced-integration axisymmetric quadrilateral, CAX4R; the first-order axisymmetric shell element, SAX1; the first-order axisymmetric membrane element, MAX1; the first-order finite-strain quadrilateral shell element, S4R; the fully integrated general-purpose finite-membrane-strain shell element, S4; and the 8-node continuum shell element, SC8R.
Membrane effects and thickness changes are modeled properly with CAX4R. However, the bending stiffness of the element is low. The element does not exhibit “locking” due to incompressibility or parasitic shear. It is also very cost-effective. For shells and membranes the thickness change is calculated from the assumption of incompressible deformation of the material.
Geometry and model
The geometry of the problem is shown in Figure 2. The circular blank being drawn has an initial radius of 100 mm and an initial thickness of 0.82 mm. The punch has a radius of 50 mm and is rounded off at the corner with a radius of 13 mm. The die has an internal radius of 51.25 mm and is rounded off at the corner with a radius of 5 mm. The blank holder has an internal radius of 56.25 mm.
The blank is modeled using 40 elements of type CAX4R or 31 elements of type SAX1, MAX1, S4R, S4, or SC8R. An 11.25° wedge of the circular blank is used in the three-dimensional S4R and S4 models. These meshes are rather coarse for this analysis. However, since the primary interest in this problem is to study the membrane effects, the analysis will still give a fair indication of the stresses and strains occurring in the process.
The contact between the blank and the rigid punch, the rigid die, and the rigid blank holder is modeled with a contact pair. The top and bottom surfaces of the blank are defined as surfaces in the model. The rigid punch, the die, and the blank holder are modeled as analytical rigid surfaces. The mechanical interaction between the contact surfaces is assumed to be frictional contact. Therefore, friction is used in conjunction with the various contact property definitions to specify coefficients of friction.
At the start of the analysis for the CAX4R model, the blank is positioned precisely on top of the die and the blank holder is precisely in touch with the top surface of the blank. The punch is positioned 0.18 mm above the top surface of the blank.
In the case of shells and membranes, the positioning of the blank depends on the contact formulation used. Node-to-surface and surface-to-surface contact formulations are available in Abaqus/Standard. For the node-to-surface formulation, the shell/membrane thickness is modeled using an exponential pressure-overclosure relationship (Contact pressure-overclosure relationships). The blank holder is positioned a fixed distance above the blank. This fixed distance is the distance at which the contact pressure is set to zero using an exponential pressure-overclosure relationship. However, the surface-to-surface contact formulation automatically takes thickness into account, and the need for specifying pressure overclosure relations is eliminated. Examples of the surface-to-surface contact formulation with S4 and S4R elements are provided in this problem.
![]()
Material properties
The material (aluminum-killed steel) is assumed to satisfy the Ramberg-Osgood relation between true stress and logarithmic strain:
The reference stress value, K, is 513 MPa; and the work-hardening exponent, n, is 0.223. The Young's modulus is 211 GPa, and the Poisson's ratio is 0.3. An initial yield stress of 91.3 MPa is obtained with these data. The stress-strain curve is defined in piecewise linear segments in the metal plasticity specification, up to a total (logarithmic) strain level of 107%.
The coefficient of friction between the interface and the punch is taken to be 0.25; and that between the die and the blank holder is taken as 0.1, the latter value simulating a certain degree of lubrication between the surfaces. The stiffness method of sticking friction is used in these analyses. The numerics of this method make it necessary to choose an acceptable measure of relative elastic slip between mating surfaces when sticking should actually be occurring. The basis for the choice is as follows. Small values of elastic slip best simulate the actual behavior but also result in a slower convergence of the solution. Permission of large relative elastic displacements between the contacting surfaces can cause higher strains at the center of the blank. In these runs we let Abaqus choose the allowable elastic slip, which is done by determining a characteristic interface element length over the entire mesh and multiplying by a small fraction to get an allowable elastic slip measure. This method typically gives a fairly small amount of elastic slip.
Although the material in this process is fully isotropic, the local coordinate system is used with the CAX4R elements to define a local orientation that is coincident initially with the global directions. The reason for using this option is to obtain the stress and strain output in more natural coordinates: if the local coordinate system is used in a geometrically nonlinear analysis, stress and strain components are given in a corotational framework. Hence, in our case throughout the motion, S11 will be the stress in the r–z plane in the direction of the middle surface of the cup. S22 will be the stress in the thickness direction, S33 will be the hoop stress, and S12 will be the transverse shear stress, which makes interpreting the results considerably easier. This orientation definition is not necessary with the SAX1 or MAX1 elements since the output for shell and membrane elements is already given in the local shell system. For the SAX1 and MAX1 model, S11 is the stress in the meridional direction and S22 is the circumferential (hoop) stress. An orientation definition would normally be needed for the S4R and S4 models but can be avoided by defining the wedge in such a manner that the single integration point of each element lies along the global x-axis. Such a model definition, along with appropriate kinematic boundary conditions, keeps the local stress output definitions for the shells as S11 being the stress in the meridional plane and S22 the hoop stress. There should be no in-plane shear, S12, in this problem. A transformation is used in the S4R and S4 models to impose boundary constraints in a cylindrical system.
![]()
Loading
The entire analysis is carried out in five steps. In the first step the blank holder is pushed onto the blank with a prescribed displacement to establish contact. In the shell models this displacement roughly corresponds to zero clearance across the interface.
In the second step the boundary condition is removed and replaced by the applied force of 100 kN on the blank holder. This force is kept constant during Steps 2 and 3. This technique of simulating the clamping process is used to avoid potential problems with rigid body modes of the blank holder, since there is no firm contact between the blank holder, the blank, and the die at the start of the process. The two-step procedure creates contact before the blank holder is allowed to move freely.
In the third step the punch is moved toward the blank through a total distance of 60 mm. This step models the actual drawing process. During this step the time incrementation parameters are set to improve efficiency for severely discontinuous behavior associated with frictional contact.
The last two steps are used to simulate springback. In the fourth step all the nodes in the model are fixed in their current positions and the contact pairs are removed from the model. This is the most reliable method for releasing contact conditions. In the fifth, and final, step the regular set of boundary conditions is reinstated and the springback is allowed to take place. This part of the analysis with the CAX4R elements is included to demonstrate the feasibility of the unloading procedure only and is not expected to produce realistic results, since the reduced-integration elements have a purely elastic bending behavior. The springback is modeled with more accuracy in the shell element models.
![]()
Results and discussion
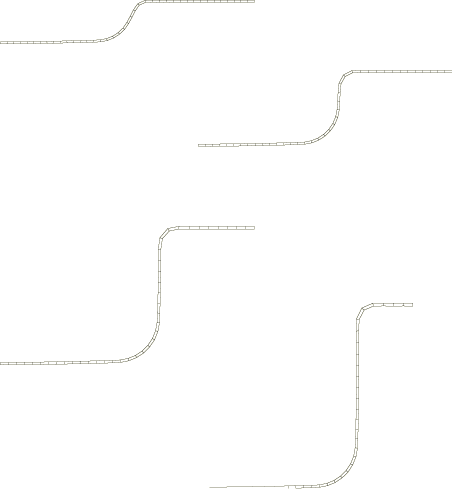
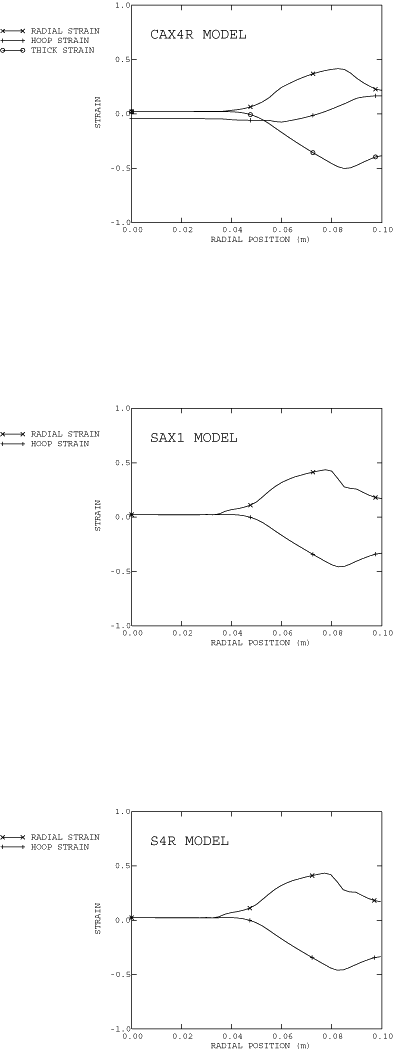
Figure 3 shows deformed shapes that are predicted at various stages of the drawing process for the CAX4R model. The profiles show that the metal initially bends and stretches and is then drawn in over the surface of the die. The distributions of radial and circumferential strain for all three models and thickness strain for the CAX4R model are shown in Figure 4. The thickness for the shell or membrane models can be monitored with output variable STH (current shell or membrane thickness). The thickness does not change very much: the change ranges from approximately −12% in the cylindrical part to approximately +16% at the edge of the formed cup. Relatively small thickness changes are usually desired in deep drawing processes and are achieved because the radial tensile strain and the circumferential compressive strain balance each other.
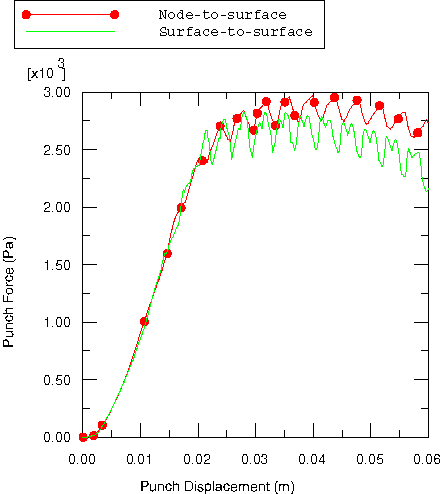
The drawing force as a function of punch displacement for various element types is shown in Figure 5, where the curves are seen to match closely. Similarly, the drawing force as a function of punch displacement with S4R elements using the node-to-surface and surface-to-surface contact formulations is shown in Figure 6. The differences in the reaction force history are due to consideration of the blank thickness explicitly in the surface-to-surface contact formulation as compared to the node-to-surface contact formulation where a pressure-overclosure relationship is specified. In all of the cases, oscillations in the force history are seen. These oscillations are a result of the rather coarse mesh—each oscillation represents an element being drawn over the corner of the die. Compared to the shell models, the membrane model predicts a smaller punch force for a given punch displacement. Thus, toward the end of the analysis the results for punch force versus displacement for the MAX1 model are closer to those for the CAX4R model.
The deformed shape after complete unloading is shown in Figure 7, superimposed on the deformed shape under complete loading. The analysis shows the lip of the cup springing back strongly after the blank holder is removed for the CAX4R model. No springback is evident in the shell models. As was noted before, this springback in the CAX4R model is not physically realistic: in the first-order reduced-integration elements an elastic “hourglass control” stiffness is associated with the “bending” mode, since this mode is identical to the “hourglass” mode exhibited by this element in continuum situations. In reality the bending of the element is an elastic-plastic process, so that the springback is likely to be much less. A better simulation of this aspect would be achieved by using several elements through the thickness of the blank, which would also increase the cost of the analysis. The springback results for the shell models do not exhibit this problem and are clearly more representative of the actual elastic-plastic process.
![]()
Input files
- deepdrawcup_cax4r.inp
CAX4R model.
- deepdrawcup_cax4r_surf.inp
CAX4R model using surface-to-surface contact.
- deepdrawcup_cax4i.inp
Model using the incompatible mode element, CAX4I, as an alternative to the CAX4R element. In contrast to the reduced-integration, linear isoparametric elements such as the CAX4R element, the incompatible mode elements have excellent bending properties even with one layer of elements through the thickness (see Geometrically nonlinear analysis of a cantilever beam) and have no hourglassing problems. However, they are computationally more expensive.
- deepdrawcup_s4.inp
S4 model.
- deepdrawcup_s4_surf.inp
S4 model using surface-to-surface contact.
- deepdrawcup_s4r.inp
S4R model.
- deepdrawcup_s4r_surf.inp
S4R model using surface-to-surface contact.
- deepdrawcup_sc8r.inp
SC8R model.
- deepdrawcup_sax1.inp
SAX1 model.
- deepdrawcup_postoutput.inp
POST OUTPUT analysis of deepdrawcup_sax1.inp.
- deepdrawcup_max1.inp
MAX1 model.
- deepdrawcup_mgax1.inp
MGAX1 model.
![]()
References
- “Analysis of Bending Effects in Sheet Forming Operations,” International Journal for Numerical Methods in Engineering, vol. 25, pp. 253–267, January 1988.
![]()
Figures


