Customizing the sheet size and grid | ||||||
|
| |||||
Context:
You can customize the following:
- Sheet size
-
The boundary of the sheet is always square, and its height and width are equal to the sheet size. If you find that the sheet size is too large or too small, you can use the Sketcher Options dialog box to change the size.
When you create a part or a stand-alone sketch, you define the approximate size of the new part or sketch; Abaqus/CAE bases the initial sheet size on the approximate size that you provide. The approximate size must be between 10–3 and 104 units for a part and between 10–3 and 105 units for a sketch. Abaqus/CAE does not use specific units, but the units must be consistent throughout the model. The Auto toggle next to the Sheet size field unlocks the field and controls whether or not Abaqus/CAE can automatically change the sheet size in the current sketch and in new sketches that you create.
- Grid spacing
-
You can use this option to change the grid spacing for major gridlines using the same units that define the Sheet size. If Snap to grid is enabled, the cursor will snap to each grid point. The Auto toggle next to the Grid spacing field unlocks the field and controls whether or not Abaqus/CAE can automatically change the grid size in the current sketch and in new sketches that you create.
- Minor intervals
-
Minor gridlines subdivide the space between major gridlines into intervals and enable you to position items in your sketch with greater precision when you have the Sketcher set to a high magnification level. You can use this option to change the number of minor intervals between each major gridline.
The display of minor gridlines is dynamic: Abaqus/CAE hides these lines at the default magnification level and reveals them as you zoom in.
- Show gridlines
-
You can toggle the display of major gridlines and minor gridlines in the Sketcher. Minor gridlines can be displayed only when major gridlines are displayed as well.
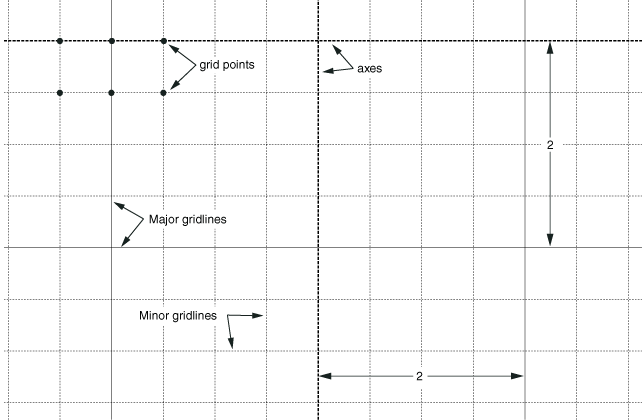
The following figure shows the relationship between the grid spacing, major
gridlines, and minor gridlines:
Sheet size and grid customization options apply to the current sketch
and are stored along with the sketch. When you create a new sketch,
Abaqus/CAE
uses the most recent settings to determine whether or not to recalculate the
sheet size and grid spacing and whether to display the grid.
From the bottom of the Sketcher toolbox, select the Sketcher customization tool
 .
.
The Sketcher Options dialog box appears.