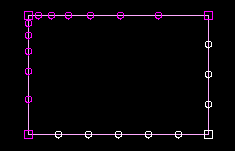
What are mesh seeds? | ||
| ||
You can create and control seeds using the menu in the Mesh module main menu bar. Abaqus/CAE generates meshes that match your seeds as closely as possible. Abaqus/CAE can use the following methods to control the distribution of the seeds:
Position the seeds uniformly along all the edges of a part or part instance
Position the seeds uniformly along an edge
Position the seeds with a bias such that the mesh density increases toward one end of the edge
Position the seeds with a bias such that the mesh density increases from each end toward the center of the edge
Position the seeds with a bias such that the mesh density increases from the center toward each end of the edge
Figure 1 shows a combination of uniform seeding and bias seeding.

You should apply seeds to all edges. If a uniform seed distribution is sufficient, the recommended approach is to seed the entire part or part instance. If you want more control over the mesh, you can partition the region and then provide seeds along the partitions you have created. This technique is described in greater detail in Verifying and improving meshes.
Mesh seeds specify only a target mesh density. If you are using hexahedral or quadrilateral elements, Abaqus/CAE often changes the element distribution so that the mesh can be generated successfully. You can prevent such adjustments by constraining the number of seeds along an edge. When you constrain seeds, you are prescribing mainly the number of elements along the edge, and, to a lesser extent, the precise locations of the nodes; if necessary, Abaqus/CAE adjusts the locations of the nodes to reduce element distortion. In addition, you should use such constraints with care, since they can make it more difficult for the mesh generator to obtain a mesh.
By default, Abaqus/CAE displays seeds on a part or assembly only when you are defining or modifying seed placement. You can enable persistent seed display if you want the seeds to appear while you perform other operations in the Mesh module; toggle on  in the Visible Objects toolbar to maintain seed display.