Color coding concepts | ||
| ||

Color coding is applied in two layers. All geometry and mesh elements are first colored with the Initial color, a customizable setting that is grey by default. (See Changing the initial color, for more information.) Abaqus/CAE then applies color coding on top of the initial color according to the colors and objects in the color mapping that you select. Areas will remain visible in the initial color if you apply a color mapping such as Boundary conditions, Loads, or Sets, for which Abaqus/CAE usually color codes only distinct points or surfaces in the model.
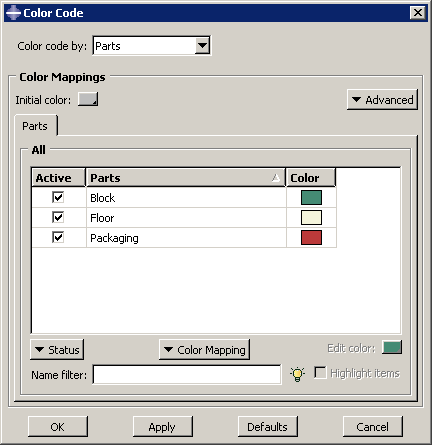
Abaqus/CAE automatically creates color mappings for all items in your model by associating the name of each item with a color in the Auto-Color List. The colors are selected by matching the Auto-Color List with an alphabetical listing of item names; thus, in the Parts example in Figure 1, Block is color coded with the first color in the Auto-Color List, Floor is color coded with the second color, and so on. Color assignments depend on the item name only; therefore, resorting these items in the Color Code dialog box does not change the color assignments.
Note:
If a region is shared by two or more items in the model, such as when a skin section is assigned to the surface and a solid section is assigned to the entire block, the common region will be colored with the color definition for the item whose name appears later in the alphabetical list. Abaqus/CAE overwrites the first color mapping color definition as each color assignment is displayed in the viewport.
Because each color mapping is a set of links between item names and color definitions, color mappings persist between modules in Abaqus/CAE and between a model database and its output databases. However, because Abaqus/CAE relies on object names for color coding, you cannot retain the color coding associated with an object when you rename that object. By contrast, Abaqus/CAE usually deletes an object's color definition when you delete the object definition from your model; the two exceptions are material and section definitions, whose color coding persists in the viewport even after you delete the definition. To refresh the color coding in the current viewport after you delete a material or section definition, you must either apply a color mapping or switch to a different module.
Abaqus/CAE also provides a default color mapping for each module. For example, when you display the Mesh defaults color mapping in the Mesh module, Abaqus/CAE color codes items in the viewport according to their meshability. Each module's default color mapping is available only in that module; you cannot color code objects in the Property module using the assignments in the Mesh defaults color mapping. Module default mappings cannot be edited, and the module default mappings correspond to the default colors that Abaqus/CAE uses if no color coding is applied.
Color mappings are viewport-specific and, in some cases, they persist between modules. Persistence of color coding between modules depends on whether you have the default color mapping displayed for your current module:
If the default color mapping for your module is selected, Abaqus/CAE automatically changes the color mapping as you switch modules. For example, if you select the Assembly defaults color mapping in the Assembly module and then switch to the Mesh module, Abaqus/CAE automatically applies the Mesh defaults color mapping.
If a non-default color mapping is selected, Abaqus/CAE retains the color mapping as you switch modules. For example, if you select the Part instances color mapping in the Assembly module and then switch to the Mesh module, Abaqus/CAE continues to color code by part instance name rather than by meshability.
When you change the color mapping, Abaqus/CAE refreshes color coding only in the current viewport while retaining any color coding in other inactive, visible viewports. When you add a new viewport to your session, the new viewport inherits the color mappings of the previously current viewport.
Once color mappings are created, you can customize any color mapping (except the module defaults) by changing the colors assigned to any of its individual objects. You can also toggle the active status of individual objects in the color mapping, which controls whether an individual object is color coded in the current viewport. Objects whose color coding is inactive are rendered with the initial color. The Color Code dialog box also provides sorting and filtering tools that you can use to display a subset of the objects in a color mapping. These tools can help you focus your display when a color mapping has many objects.