Access the local SIMULIA Execution Engine.
Create a directory called keys. This directory can
be located anywhere on the local SIMULIA Execution Engine
(for example, c:\keys). It will hold certificates and
related files.
Navigate to the following directory:
<websphere_install_directory>\AppServer\bin
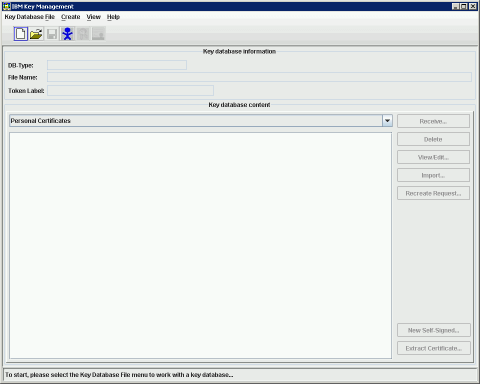
Access the IBM Key Management dialog box, which
is used to create and manage digital certificates, using one of the following
methods:
The IBM Key Management dialog box appears.
From the Key Database File menu, select New
to create a new key database file.
The New dialog box appears.
From the Key database type list, verify that
JKS is selected.
Type server.jks in the File
Name text box, where server is the name of the
SIMULIA Execution Engine
that you are configuring.
In the Location text box, type the path to the
keys directory created in Step 2.
Click OK.
The Password Prompt dialog box appears.
Enter a password that will be used to protect this key file. This password
is different than the passwords for any digital certificates stored in
the key file.
Click OK.
You are returned to the IBM Key Management dialog
box.
From the Key database content list, select Personal
Certificates.
The list of certificates in the center of the interface is cleared.
In the lower right corner of the IBM Key Management
dialog box, click New Self-Signed.
The Create New Self-Signed Certificate dialog
box appears.
Specify the following settings for the new certificate:
-
In the Key Label text box, specify the certificate
name as follows, where server is the name of the local SIMULIA Execution Engine:
server (client) self-signed certificate
-
Verify that the Version option is set to X509
V3.
-
Verify that the Key Size option is set to 1024.
-
In the Common Name text box, specify the full
name of the local SIMULIA Execution Engine
(for example, federationssytem.company.com).
-
In the Organization text box, specify the name
of the company hosting the local SIMULIA Execution Engine.
Note:
The remaining optional settings can be filled in, if
desired. However, they are not needed to successfully configure the Federation
feature. The Key Label, Common Name,
and Organization settings are required, but any
non-empty value can be entered.
Click OK.
The certificate is created in the keys directory, and
you are returned to the IBM Key Management dialog
box.
Extract the public part of the certificate.
This public part is the portion of the certificate that is sent to the
remote SIMULIA Execution Engine
for importing as a “signer” on the remote system.
-
In the lower right corner of the IBM Key Management
dialog box, click Extract Certificate.
Note:
Do not use Export.
This option performs a similar task, but it is not needed for configuring
the Federation feature.
The Extract Certificate to a File dialog box
appears.
-
From the Data type list, verify that Base64-encoded
ASCII data is selected.
-
In the Certificate file name text
box, type server.arm, where server
is the name of the local SIMULIA Execution Engine.
-
In the Location text box, type the location of
the keys directory.
-
Click OK.
The certificate is extracted.
Close the IBM Key Management dialog box.
Navigate to the keys directory, and verify that the
following two files are present, where server is the name
of the system running the SIMULIA Execution Engine:
Repeat Steps 1 through 18 on each SIMULIA Execution Engine
that you want to include in your federation environment.
Proceed to Exchanging the Extracted Certificates.