Creating a datum axis along a principal axis | ||||||
|
| |||||
Context:
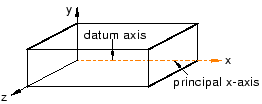
The figure below shows an example of creating a datum axis by selecting a principal axis.
From the main menu bar, select .
The Create Datum dialog box appears. The dialog box outlines the types of datum geometry you can create.
Abaqus/CAE displays prompts in the prompt area to guide you through the procedure.
Tip: You can also create a datum axis using the  tool, located in the module toolbox. For a diagram of the
datum tools in the toolbox, see
Using the Datum toolset.
tool, located in the module toolbox. For a diagram of the
datum tools in the toolbox, see
Using the Datum toolset.