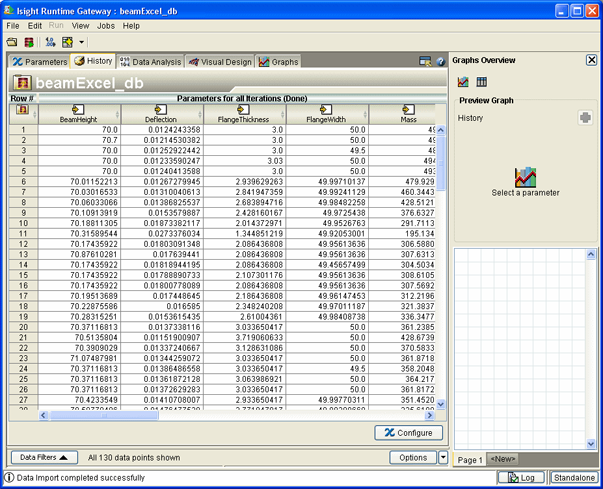
From the Runtime Gateway,
select .
Navigate to the file you want to import, and click Open.
If you are importing an Excel worksheet, specify which sheet on the
worksheet you want to import, and click OK.
If desired, from the Import From File wizard
that appears displaying information that Isight
has attempted to determine about the data, change any of the following
settings to specify which data points to import:
| Option |
Description |
|---|
| Delimiter |
Specify a pre-set delimiter character
using the corresponding list. If you want to use a delimiter that is
not provided, select Other; then type the delimiter
character in the text box below the list. When the delimiter is changed, Isight
updates the data table to show the resulting columns. Note:
If you select the Space delimiter,
contiguous instances of a space count as a single delimiter. For all
other delimiters, contiguous instances count as distinct delimiters.
|
| Initial Data Row |
Specify the row that contains
the first line of parameter data. Isight
displays the specified row in red. |
| Parameter Names Row |
Specify the row that contains
the column names. If specified, this row must precede the initial data
row. Isight
displays the specified row in yellow. This row can contain index expressions
(in which case it is assumed that the corresponding parameters are arrays)
or periods (in which case it is assumed that the corresponding parameters
are aggregates). If column names are not present in the data file, the
inferred parameters are automatically named based on their column position
(e.g., Column0, Column1, etc.). |
| Number of Inputs |
Specify how many input columns
to extract from the file (not the number of input parameters). These
two values are not the same when arrays and aggregates are imported. |
| Skip Bad Rows |
Specify if you want Isight
to skip rows that contain bad data during the import. Bad data can occur
in imported data files for several reasons:- The data file may contain blank lines between or following the data
rows. More broadly, the data rows may be only a portion of a larger body
of general text.
- The data type of each column is determined from only the top 100 data
rows. Rows that follow the 100th row can invalidate this determination
(e.g., a column of Real values where the first 100 appear as Integer
values).
- The delimiter may be chosen incorrectly causing the data rows to not
all split into the same number of columns.
|
Click Next.
The Configure the Parameters screen appears.
The input and output parameters extracted from the data file are listed.
By default, all the parameters are selected for import (indicated by
a check mark in the Import column).
Note:
Sometimes the splitting of the column names row yields
column headers that cannot be used as parameter name or that appear over
more than one column. When this situation occurs, column-position names
are used instead, and the affected parameters are (initially) not selected
for import.
If desired, do any of the following.
-
Customize the displayed parameter information by selecting one of the
following:
 |
Removes any filtering that was applied
to the table and returns the table to its original state. |
 |
Applies filtering to the table. When clicked, the
Table Filters dialog box appears, which allows
you to filter based on the parameter’s name, mode, or type. |
 |
Allows you to display or hide certain columns. The
Name column is always displayed. |
This customization only affects the display, it does not affect the
import.
-
Select the parameters to import by checking or clearing (unchecking)
the check boxes in the Import column.
-
Change the name, mode, or type setting of any parameter using the corresponding
columns.
Click Finish.
Isight
imports the data into the Runtime Gateway.

The Runtime Gateway
has been slightly altered. The model explorer is no longer visible, only
a subset of the typically displayed tabs are available, and several options
(including the Run button) have been removed from
the toolbar. Because you are viewing raw data instead of an Isight
model, all model-related options are hidden.
Analyze and visualize the data using any of the following options:
If desired, repeat the above steps to import more data files. You can
switch between files by selecting the file from the Jobs
menu. The data file will be given an example_ext name (where
example is the name of the file and ext is
the extension).
|